Got a new MacBook and unaware about how to edit a PDF? It seems quite easy to perform such actions on Android or Windows platforms, but it becomes quite strenuous on macOS. If you are reading this article, then you are about to obliterate your perplexity on how to edit a PDF on Mac.
PDFs, nowadays, are the most utilized format. It is used while providing any assignment to students, in net banking, or while filing any form. Filing up a form becomes irksome when one has to print it, fill it up using a pen, and then upload it by generating another PDF. Therefore, it becomes necessary to have an idea of how to use and edit PDFs.
Hence, to gain an idea, this article provides the audience with a wider spectrum to form a solution for the perplexed audience on how to edit a PDF on Mac. We will be beginning with the software which does not cost a penny.
How to Edit a PDF on Mac
Certainly, there are innumerable third-party apps that can aid the perplexity. But, at first, we will be discussing the software pre-existing in macOS whose aid is not going to cost a penny. In the beginning, we have ‘Preview’:
Method 1: Edit PDF in Preview on Mac
In order to edit a PDF free of charge, the following steps are vital:
Step 1: First, you must open the PDF file in Preview in macOS.
Step 2: Then after opening the file in preview, place the cursor in the exact location where you want to edit. In this case, we are inserting a text.
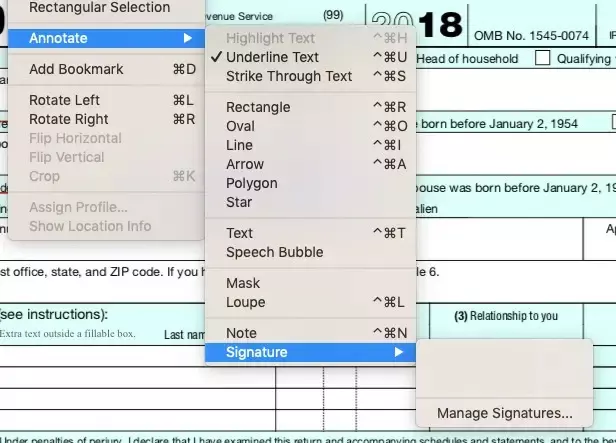
Step 3: In order to insert a text, click on ‘tools’ visible in the upper menu bar.
Step 4: After clicking on ‘tools’, a new menu will open up. In this menu select ‘annotate’.

Step 5: After selecting ‘annotate’, another menu bar will pop up, in that menu select ‘text’.
Step 6: Finally, you have control over the PDF and now you can type the text you want to add to your PDF and customize the ‘text’ with your preferences.
Here, we have offered a first glance at the process of how to edit a PDF in Mac. You can choose various colors to highlight the selected text. By using different colors, it will become uncomplicated to search for the significant portions in the PDF.
It will also aid in distinguishing between the more significant parts and less significant areas by optimizing both using distinguishable colors.
Method 2: Edit PDF using QuickLook on Mac
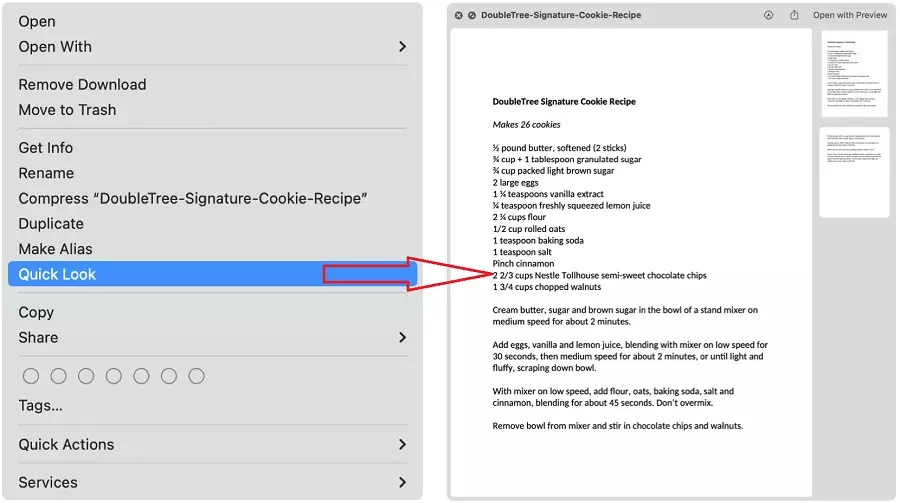
The second free-of-cost method is QuickLook for opening a preview of a PDF on your Mac without necessarily needing to open the software associated with it. Any document can be previewed by locating it in the finder. Just click on the file to select it and press the spacebar. Now, we will move towards on how to edit a PDF on Mac via QuickLook:
Step 1: First, find the PDF you want to edit.
Step 2: Secondly, select it and press the spacebar.
Step 3: Then, when you press the spacebar a preview of the selected file will appear.

Step 4: In the top right of the preview look for an icon that looks like a pencil.
Step 5: A series of editing tools will appear, click on the text ‘T’ tool in the menu.
Step 7: After selecting the text tool, a textbox will appear which can be dragged to its favorable position according to the user and any text can be edited inside the textbox.
Step 8: The appearance can also be altered by selecting the drop-down button. This will represent the PDF in a more engaging manner and will attract many audiences.
Step 9: Once the editing procedure is achieved, then click on the ‘done’ button to save the applied changes.
Step 10: Now you have access to the complete PDF.
Congratulations, you have just found another method on how to edit a PDF on Mac.
How to Add Signature in PDF Using QuickLook?
QuickLook also possesses another vital element, i.e., adding a signature. In order to do so, the following steps are necessary:
Step 1: Click on the signature icon in the menu.
Step 2: Select ‘create signature’ from the aligned option.
Step 3: Now, to add your signature, either use a trackpad or sign your name on a piece of paper and hold it up to the camera.
Step 4: Use of a thick black pen is recommended.
Step 5: After completion of the steps mentioned above, click on the signature and it will be added.
Step 6: You can drag the signature into your preferred place in the PDF.
While editing PDFs it becomes obligatory to rearrange or add pages in the PDF. Therefore, learning about how to rearrange or add up pages also becomes obligatory and the only platform to learn how to edit PDF on macOS is this article.
How to Rearrange or Adding Up Pages in PDF on Mac
The following steps are necessary to rearrange or add up pages:
Step 1: Click on the View menu in the menu space (above the Aa tool).
Step 2: Choose thumbnails after selecting Menu.
Step 3: In order to add a PDF, you can drag it from the desktop into the sidebar.
Step 4: To remove or rearrange, click on the thumbnail of the page to select it and press delete.
With this process, you can delete, rearrange, or add up pages in your PDF according to your desire.
Conclusion
After introducing the no-cost tools and how they work, we will be moving towards the third-party applications which are also commendable. One of the innumerable such applications is, Pdfelement. This is another tool to edit pdf on Mac.
If you want to take your pdf to a sounder footing then use of this application is recommended. It automatically arranges texts, uses OCR to turn any documents into edible PDFs, and has a whole lot of other features as well.
Therefore, in short, there are scores of procedures to edit a pdf on Mac. We hope that this article provides you with the ultimate solution to the perplexity with which we began the article.
